Pressure Cooker Egg Biryani
Introduction
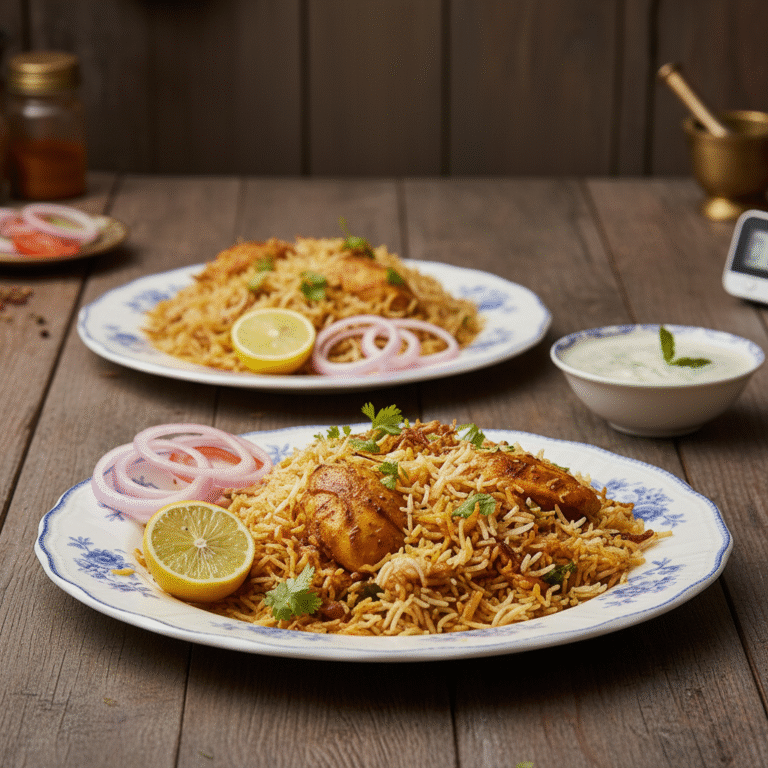
The recipe is for a simple and quick pressure cooker egg biryani. It offers an easy alternative to the traditional, time-consuming biryani while keeping the rich taste intact. Despite its simplicity, the dish turns out delicious and full of flavor.
Summary of the Recipe
This Egg Biryani recipe is a celebration of fragrant spices, tender eggs, and fluffy rice. Furthermore, it’s a one-pot wonder that’s perfect for a special family dinner or entertaining guests. Ultimately, you’ll create a restaurant-quality dish that is both comforting and incredibly delicious.
Serving
The egg biryani should be served hot . It is recommended to serve it with some onion raita by the side.
Preparation Time
- Rice Soaking: The basmati rice needs to be soaked for 30 minutes prior to use.
- Frying Eggs: The eggs are fried for about two minutes until coated with masala.
- Cooking Curd Mixture: The curd mixture is cooked for five minutes on medium flame.
- Cooking Time: Once the steam comes out of the pressure cooker, the biryani is cooked for about 10 minutes on medium low flame.
- Resting Time: After turning off the pressure cooker, the biryani must rest for about 10 minutes before opening.
Equipment Needed
- A pan (used for frying the onions and frying the eggs) .
- A pressure cooker.
Ingredients
Rice & Liquid
- 🍚 Basmati Rice: 300 grams (soaked for 30 minutes)
- 💧 Water: 2 cups (about 500ml)
Fats
- 🫒 Oil: 2 tablespoons (for frying onions) + 1 tablespoon (for base)
- 🧈 Ghee: 2 tablespoons (for biryani base).
Main/Protein
- Eggs: (boiled with slits before frying)
Vegetables & Aromatics
- 🧅 Large Onion: 1 (sliced, for frying)
- 🧅 Medium Onions: 2 (thinly sliced, for biryani base)
- 🌶️ Green Chilies: 3 (slit)
- 🧄 Ginger-Garlic Paste: 1/2 teaspoon
- 🍅 Small Tomatoes: 3 (finely chopped)
- 🍶 Curd (Yogurt): Half cup (mixed with spices for gravy)
Fresh Herbs & Garnish
- 🌿 Coriander Leaves: Half bunch (for gravy) + a few chopped (for layering)
- 🌿 Mint Leaves: Half bunch
- 🧅 Fried Onions: A few (for layering)
Whole Spices (for Base)
- 🪵 Cinnamon: 1 piece
- 🌟 Star Anise: 1
- 🟢 Cardamom Pods: 3
- 🔴 Cloves: A few
- 🍃 Bay Leaves: 2
Powdered Spices & Seasoning
For Egg Coating:
- 🧂 Salt: 1/4 teaspoon
- 🟡 Turmeric Powder: 1/4 teaspoon
- 🌶️ Red Chili Powder: 1 teaspoon
For Gravy:
- 🧂 Salt: 1 teaspoon (for tomatoes) + about 1 teaspoon (for rice layer)
- 🌶️ Red Chili Powder: 2 teaspoons
- 🌿 Coriander Powder: 1 teaspoon
- 🟡 Turmeric Powder: 1/4 teaspoon
- 🔥 Garam Masala Powder: 1 teaspoon

Instructions for Pressure Cooker Egg Biryani
Step 1: Prep Your Ingredients
First, begin by boiling and peeling the 6 eggs. Then, make 2-3 gentle slits on each egg so the masala can penetrate. After that, slice all your onions and chop the tomatoes and herbs. Finally, measure out all your spices. This mise en place makes the cooking process smooth and enjoyable.
Step 2: Fry the Onions and Eggs

Next, heat 2 tablespoons of oil in a pan. Fry the one large sliced onion on high heat until it turns a lovely golden brown and crispy. Set these fried onions aside they are crucial for garnish.

Meanwhile, in the same pan, lower the flame. Add the quarter teaspoon each of turmeric and salt, plus 1 teaspoon of red chili powder. Gently roll the slit eggs in this masala and fry them for about two minutes until they are coated and fragrant. Once done, set these spiced eggs aside.
Step 3: Build the Flavorful Base

Now, take a pressure cooker and add the remaining 1 tablespoon of oil and 2 tablespoons of ghee. Once the ghee is hot, add all the whole spices—cinnamon, star anise, cardamom, cloves, and bay leaves. Let them sizzle for 30 seconds to release their aroma.

After that, add the two thinly sliced medium onions. Sauté them until they achieve a golden brown color. Then, add the slit green chilies and ginger-garlic paste, cooking for another minute until the raw smell disappears.
Step 4: Create the Rich Gravy

Now, it’s time for the tomatoes. Add the three finely chopped tomatoes and 1 teaspoon of salt. Cook until they turn soft and mushy.
While the tomatoes are cooking, prepare the spiced curd. In a separate bowl, mix the half cup of curd with 2 teaspoons of red chili powder, 1 teaspoon of coriander powder, a quarter teaspoon of turmeric powder, and 1 teaspoon of garam masala powder.


Once the tomatoes are soft, add this curd mixture to the pressure cooker. Cook everything for five minutes on a medium flame, stirring occasionally, until the gravy thickens slightly and the raw taste of the spices is gone.
Step 5: Add Freshness and Rice

Next, stir in the half bunches of chopped coriander and mint leaves. Their fresh aroma will instantly elevate the dish.

Now, drain the soaked 300 grams of basmati rice and add it to the cooker. Gently mix it with the masala base for a minute. Then, pour in the 2 cups of water and add the final teaspoon of salt. Give it one gentle stir.
Step 6: The Final Layer and Dum

This is the final stage. Carefully place the fried eggs one by one into the cooker. Then, garnish the top with the reserved fried onions and a few more chopped coriander leaves.

Finally, close the pressure cooker lid and place the weight on. Once a steady stream of steam comes out, reduce the flame to medium-low and cook for exactly 10 minutes.
Step 7: Rest and Serve Perfectly

After 10 minutes, turn off the heat. However, do not open the lid immediately. Let the biryani rest for another 10 minutes. This allows the rice to finish cooking in the residual steam and for all the flavors to meld together perfectly.

Then, gently fluff the rice and serve your magnificent Egg Biryani hot.
“Let’s Cook This Together!” My goal is to make sure you succeed in your kitchen. If you hit a snag while making this “Pressure Cooker Egg Biryani” , I want to hear about it. Send me an email directly, and I’ll do my best to help you troubleshoot so your meal turns perfectly.myhomekitchen333@gmail.com.
“Find Your Next Favorite Meal” → Explore hundreds of recipes at myhomekitchen.in